To add Vosaic as an external tool to Brightspace you'll need to first configure it inside Brightspace, then inside Vosaic. Below are the steps for both.
1. Brightspace: Dynamic Registration
You must be logged in to Brightspace as an Administrator.
- Click the settings gear in the top right, and select Manage Extensibility from the drop-down
- Select the LTI Advantage tab
- Press the Register Tool button
- Select Dynamic
- Tool initiation registration endpoint:
https://vosaic.com/lti - Check the Configure Deployment option
- Press the Register button
- You'll be redirected to Vosaic to confirm the connection
- Press the Yes, Continue" button
- A Success message will appear
- Press the Close button
- If you receive an error connect using the steps below
- If you get a success message skip the 2. Brightspace: Standard Registration step
2. Brightspace: Standard Registration
You must be logged in to Brightspace as an Administrator.
- Click the settings gear in the top right, and select Manage Extensibility from the drop-down
- Select the LTI Advantage tab
- Press the Register Tool button
- Select Standard
- Set Enabled to Yes (should be the default setting)
- Name: Vosaic
- Description: Video submission and feedback
- Domain:
https://vosaic.com - Redirect URLs:
https://vosaic.com/openid - OpenID Connect Login URL:
https://vosaic.com/ltilogin - Target Link URI
https://vosaic.com/videos - Keyset URL:
https://vosaic.com/api/v1/jwks - Extensions:
- Deep Linking
- Assignment and Grade Services
- Configuration settings:
- Check: Open as External Resource
- Check: Grades created by LTI will be included in Final Grade
- Check: Auto Create Grade Items
- Press the Register button to complete the registration
- Once registered, you'll see Vosaic listed under LTI Advantage registered tools
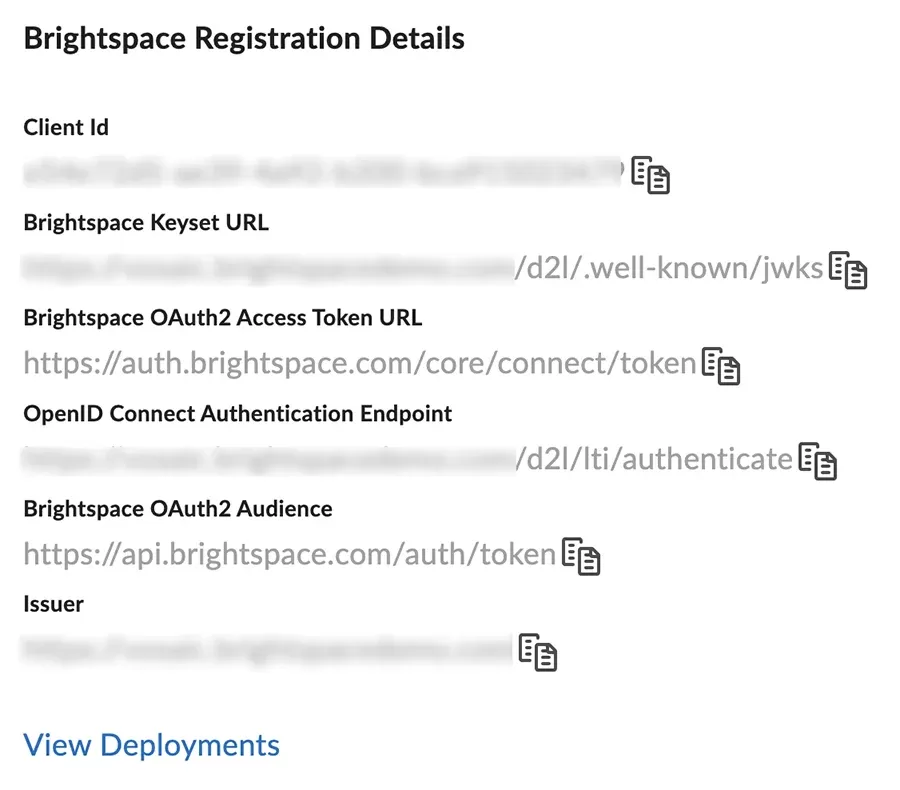
- Click the the Vosaic link and scroll to the bottom of the page where you'll see Brightspace Registration Details
- Make sure to copy this information somewhere you can easily access as you'll need it to configure Brightspace in Vosaic (last step below)
3. Brightspace: Create a Deployment
- On the LTI Advantage registered tools page, click the Vosaic link (or whatever you named the Vosaic tool)

- Scroll to the bottom and press the View Deployments link
- On the next page click the New Deployment button
- Select and enter following:
- Tool: Select Vosaic
- Name: Vosaic
- Under Extensions: check the Deep Linking option
- Under Security Settings: check the User Information option
- Under Configuration Settings: check the Open as External Resource option
- Press the Add Org Units button and make sure to select the units where Vosaic should be available
- After checking the boxes for the desired Org Units, click the Add button at the bottom left
- Click the Save and Close button at the bottom left
4. Brightspace: Create Deployment Links
Create a Basic Launch Link
- On the External Tools Page → LTI Advantage tab, click the Vosaic link
- Scroll to the bottom and make a note of the Deployment Id. You will need this in the final step to configure Vosaic
- Click the View Links link
- Press the New Link button
- Enter Following:
- Enabled: Yes
- Name: Vosaic
- URL: https://vosaic.com/videos
- Type: select Basic Launch
- Press the Save and Close button
Create a Deep-Link Link
- On the External Tools Page → LTI Advantage tab, click the Vosaic link
- Click the View Links link
- Press the New Link button
- Enter Following:
- Enabled: Yes
- Name: Vosaic
- URL: https://vosaic.com/lti/deeplinking
- Type: select Deep Linking Quick Link
- Press the Save and Close button
5. Vosaic: Add Brightspace to Vosaic
Remember this info from the steps above? We'll need this info in Vosaic to complete this step. We'll also need the Deployment Id mentioned above.
Important:
- You must be logged in to Vosaic as an Administrator
- You must know your LMS's Authentication and Certification URLs
Once logged in to Vosaic follow these steps:
- From the main navigation in the top right click the Hi, [Name] tab and select Features from the drop down
- Click the Settings button in the Learning Tools Interoperability (LTI) box.
- Click the Add Manual LTI Configuration button
- Map the fields in Vosaic to the following fields from the screenshot above:
- Integration Name: Brightspace
- Platform URL:
Issuer - Authentication End Point (url that ends with "/authenticate"):
OpenID Connect Authentication Point - Certificate URL (url that ends with "/jwks"):
Brightspace Keyset URL - Client ID:
Client Id - Deployment ID:
Deployment Id - Press the Save Changes button